QTP File System Objects login using Text file


Create a Text file with Username,Password

Username,Password
xxxxxxx,xxxxxxx
xxxxxx,xxxxxxxx

Option Explicit
Dim ObjFSO,ObjRD,Name

Set ObjFSo = Createobject("Scripting.filesystemobject")
Set ObjRD = ObjFSo.Opentextfile("c:\root folder\testing.txt")

While ObjRD.atEndOfline = false

Name = ObjRD.readline

Systemutil.Run "flight.exe application path"

Dialog("login").WinEdit("Agent Name").Set name
Dialog("login").WinEdit("Password").Set name
Dialog("login").WinButton("OK").Close

Window("Flight Reservation").Close

wend

ObjRD.Close

Set ObjRD = nothing
Set ObjFSo = nothing

Mobile Application Testing

Mobile Application Testing these days having huge requirements for testing,mostly on Cloud based testing.Mobile apps are building so many ,if you see in google Play more games ,more Mobile Apps with different concepts.

Mobile App testing will follow same testing concepts like Manual Testing Process.

1.Preparing Test Plan
2.Preparing Test Scenarios
3.Preparing Test Cases
4.Execution of Test Cases
5.Bugs Reporting
6.Preparing Summary Report
7.Test Closure

In above process we will test Mobile App with different Technologies according to Client Requirements suppose Example IOS , Android ,Windows etc.

Testers Performs

1.Manual Testing
2.Automation Testing
3.Performance Testing
4.Security Testing
5.Comparability Testing
6.Recovery Testing


These Days most of the companies are acquiring Mobile Testers ,there is a huge demand for mobile testes in marketing.

how to identify objects in qtp

QTP(Quick Test Professional) identified the Objects from the web application i.e Test Objects .

QTP has 4 types of Object Identifiers

1. Mandatory Properties
2. Assistive Properties
3. Ordinal Identifier
4. Smart Identification


QTP mainly identify the objects in Desktop,Web applications using mandatory objects Ex:name,Id.
Quick Test Professional uses identification properties to identify the Test Objects ,Run Time Objects in Web,Desktop application.

So in order to test a application may be it is Desktop or Web application you need to identify the Test Objects in Application ,in order to define the Framework for your application you need Test Objects to identify the application Elements.Today we are going to learn QTP object identification Types.


Mandatory Properties:


Mandatory properties are those properties where QTP identify the objects while recording the Test Script.

Ex:
Systemutil.Run "iexplore","http://qaqtptutorials.wordpress.com"
Browser("Software Testing Tutorials").page("Software Testing Tutorials").Sync
'To check the Text box
Browser("Software Testing Tutorials").page("Software Testing Tutorials").WebEdit("name:=Username").Sync

Here we used name as mandatory property for WebEdit Test Object Class.

Assistive Properties:


If QTP has not identifying the objects with Mandatory Properties then QTP will use additional property to identify the Test Objects in application.

If you are using descriptive programming  with out Object Repository then we can use more properties to identify the Test Objects in application like below

Browser("name:=Software Testing Tutorials").Page("title:=Software Testing Tutorials").WebEdit("name:=Username").Set "xxxxxxxx"
Browser("name:=Software Testing Tutorials").Page("title:=Software Testing Tutorials").WebEdit("id:=password").Set "xxxxxxxx"

Ordinal Identifier:


We can use Ordinal Identifier to identify the Test Objects in Application ,in this we have Creation Time,Index,Location features to identify the Objects in application.

We can use this ordinal identifier if application having no of text boxes which is having some same properties at that time we can use.

First Name:Text Box 1
Last Name:Text Box 2
Middle Name:Test Box 3

Here for each text box we can identify as index:=0 ,Index:=1 , index:=2
Now we can write the test script as


Browser("name:=Software Testing Tutorials").Page("title:=Software Testing Tutorials").WebEdit("name:=test","index:=0").Set "Rajesh f"
Browser("name:=Software Testing Tutorials").Page("title:=Software Testing Tutorials").WebEdit("name:=test","index:=1").Set "rajesh s"
Browser("name:=Software Testing Tutorials").Page("title:=Software Testing Tutorials").WebEdit("name:=test","index:=2").Set "Rajesh t"

Same Example for Location

Browser("name:=Software Testing Tutorials").Page("title:=Software Testing Tutorials").WebEdit("name:=test","location:=0").Set "Rajesh f"
Browser("name:=Software Testing Tutorials").Page("title:=Software Testing Tutorials").WebEdit("name:=test","location:=1").Set "rajesh s"
Browser("name:=Software Testing Tutorials").Page("title:=Software Testing Tutorials").WebEdit("name:=test","location:=2").Set "Rajesh t"

Same we can use it for Creation time also ,mostly we can use it for browsers close functionality.While opening the browser some creation time will create at that time we can use this technique.

Smart Identification

QTP is not able to find the test objects in application with above three properties at that time qtp automatically identify the test objects using Smart identification mechanism.

Navigation to Object Identification in QTP

Tools-->Object Identification.


Manual Testing SDLC models

SDLC Model:
SDLC model is a process,activities and the task completed in development and maintenance of a web application or Software.

Types of SDLC Models

1.Waterfall Model
2.Spiral Model
3.Prototype Model
4.RAD(Rapid Application Development)
5.Iterative and Incremental Model
6.Agile Method

1.Waterfall Model

Waterfall model as "Classic model" sequential step by step model.This model is a sysmatic ,sequential approach of software development.Waterfall model begin with requirement stage,progress through remaining life cycle.


In requirements stage all the BRD , SRD , FSD will be reviewed ,distributed to the development ,testing team for review the documents.

In Design stage development team will start develop the application according to client requirements,in design stage web application or any software architecture will design for developing the application or software.According to design pattern development team will start setup the environment like Installing Java,software tools etc.After completion of environment set up development team will start developing the application.

In coding stage development team start coding the application according to client requirements.If client wants java development then project is passed to java team,if develop using php then it will given to php team.Coding will start with the use of design documents.

After completion of coding of some requirements dev team will prepare Build in the form of Ear file ,That ear file will send through Build release note and configuration details.

Testing team will test the build by deploying the build in qa environment.

Like this process will happen.

Water fall model will suitable for clearly defined requirements.Suitable for small,medium proojects.
Projects will under control because after completion of each stage will go for next stage.
Pre defined outputs at every stages.Tracking of changed is easy in waterfall model.Early identification of defects in every stage in order to fix with in stage only.


Software Testing process in Manual Testing


Software Testing starts with Documents review i.e FSD,SRD or BRD documents.


Software Testing will follow below process in companies

  • Test Plan preparation
  • Test Scenario preparation
  • Test Cases writing Test Case Template
  • Test Execution once build received
  • Integration Testing Level Ex: SAP posting,GP posting etc..
  • System Level Testing
  • User Acceptance Testing
  • Testing in Production
  • Installation Testing
  • Implementation
  • Support for released product

Software Testing - Testing Life Cycles


In Software development process,  we have two type of life cycles

1. SDLC (Software Development Life Cycle).
2. STLC (Software Testing Life Cycle).

Software Developments Life Cycle

Software development life cycle  is a process of developing software application.

Process will begin as follows
1. Requirements
2. Analysis
3. Design
4. Coding
5. Testing
6. Implementation
7. Support/maintenance

Requirements

1. Clients provides requirements in the form of business requirement document.
2. After receiving the requirements company will conduct meeting and identify work manager.
3. Identifying the standards, procedures, guidelines, checklist for required to develop the project.
4.  Review of SRS and approval of SRS.
5. Based on approval SRS software architecture will create blue print or proto type.

Analysis

1. In this stage domain expert or functional expert will review the requirements.
2. Domain experts will create required design documents.

Design

Development team will create  low level design, high level design documents in the form of HTML etc.

Coding

Development team start develop application according to low level, high level documents.

Testing:

Developed application is given to testing team to start the testing on given build.

In this stage QA and Testing will start according to STLC.

2. STLC (Software Testing Life Cycle)

Software Testing Life Cycle will follows below process

  1. Requirements
  2. Analysis
  3. Design
    • Test Plan
    • Test Scenario
    • Test Cases
  4. Test Execution
  5. Test Summary
  6. Test Closure
Requirements
  1. Software Testers will get SRD, FRS ,Design documents in the form of requirements.
  2. Testers will review the requirements with above mentioned documents.
Analysis:
  1. Software Testers will analysis requirements for understanding the flow of application.
  2. Testers will prepare Query tracker for requirements Gap.
  3. Example: For Username field validation,Type etc requirements are missing.
  4. Testers will receive the Query Tracker response to confirm the requirement specifications.
  5. Testers will get approval from Test Lead,Test Manager regarding SRD , FRS , Design documents  to proceed further testing.
Design:
  1. Once SRS ,FRS etc documents are approval then Test Lead will start preparing Test Plan according to mentioned documents.
  2. Once Test Plan is approved by Manager then Testers will start prepare Test Scenarios.
  3. Completed Test Scenarios are send to Test Lead for Approval.
  4. Test Lead will review the Test Scenarios with Client Requirements,if it is covered then Test Lead will approve the same.
  5. Once Test Scenarios are approved Testers will prepare Test Cases according to Test Scenarios.
  6. Once Test cases are completed it will send to Test Lead for approval.
  7. Test Cases will approve if all the Test scenarios are covered.
Test Execution
  1. Once Build received from Development Team,Testers will start Testing on given build
  2. Development Team will send build release note in the form of Email with Covered requirements.
  3. Testers will perform Sanity/Smoke Testing on given build to test main functionality.
  4. Once the Sanity/Smoke testing is pass tester will start execution of test cases.
  5. If testers get any defects ,testers will log the defect in Test Management tools.
  6. Development team will fix the defect and send email to tester.
  7. Testers will perform retest on fixed defect to confirm whether it is fixed or not.
  8. Once all the defects are closed ,Test Lead will prepare Test Summary Report ,closure of testing.

How to use transactions in QTP


Transactions


Transactions are used to find the speed of test script execution between the start and end point  means how much time it is taken to execute particular block of script.

In QTP having two Transactions

1.Start Transaction
2.End Transaction

Ex: 

Service.start Transaction<"Click Link">
Browser("Software Testing Tutorials").page("Software Testing Tutorials").link("text:2015").Click
Service.End Transaction<"Load Page">

Steps:

1.Go to Insert-->Start Transaction
2.Enter Transaction Name

1.Go to Insert-->End Transaction
2.Enter END transaction name.

QTP Synchronization Topics


Synchronization:

When we run out application at that time out application may not respond with the expected speed.


For example: 

  1. Progress bar to reach 100%.
  2. Status message to appear.
  3. Button become enable.
  4. Pop up window message to appear.
We can handle these timings problems by synchronizing your test script to ensure that quick test professional waits until web application is ready before performing any step.

We are having three synchronizations:

  1. Synchronization point.
  2. Wait and Exist.
  3. Increase time out.
Synchronization Point

 It is instruct QTP to stop the test until object property achieves the value in particular application.
We can use this option to provide waiting time  to the QTP based on particular object property.

Syntax: 

Browser("Browser name").page("page name").waitproperty "text","successful message",time in millisecond.


Steps to generate Synchronize point:

1.Place the cursor in required place of script.
2.Click on Start Recording
3.Click Insert-->Synchronization
4.Show object with hand icon
5.Press OK
6.Select Property name[Enable]
7.Enter property value[true]
8.Timeout in milliseconds
9.Press OK
10.Stop recording

Wait:
Wait is used to wait qtp untill object found according to specified time

Example:

Browser("Browser name").page("page name").Sync
Wait(5) //5 in milli seconds
Browser("Browser name").page("page name").WebEdit("Password").GetROproperty("text")


QTP Recording Modes


There are three types of Recording modes in QTP
  • Standard Recording (Default)
  • Analog Recording
  • Low level Recording
Standard Recording:
  1. Records the test in terms of GUI objects in qtp.
  2. QTP records the objects in application and application performed steps.
  3. Standard mode is the default and takes advantage of quick test object finding.
Analog Recording:
  1. Analog recording records the exact mouse and keyboard operations in applications relation to screen or application window.
  2. Analog recording will display in single line with track file.Window("microsoft Internet").Runanalog"track"
Low Level Recording
  1. This low level recording is enables to record all run time objects as window
  2. Generally for Multimedia purposes.

How to get links property using Selenium


Create class in Eclipse.
public class Links
{
Selenium sel = new DefaultSelenium("localhost",4444,"firefox","http://www.xxxxxxx.com");
public void test() throws Interrupted Exception
{
sel.start();
sel.open("/")
sel.windowmaximize();
String a[]=sel.getAllLinks();
System.out.println("Number of links propertties:"+a.length);
int l=a.length;
for(i=0;i lessthan l;i plus plus)
{
System.out.println("link id"+a[i]);
}
}

How to handle Controls in Selenium


1.Create Class in Eclipse.

public class Controls
{
Selenium sel = new DefaultSelenium("localhost",4444,"firefox","http://www.xxxxx.com")
public void test() throws Interrupted Exception
{
sel.start();
sel.open("/");
sel.windowmaximize();
sel.click("link=Test page for Selenium Remote Control");
Thread.sleep(2500);
sel.select("id=Select with label only","label=Option three");
sel.select("id=Selectwith labels And Value","label=Option two");
//Handling Text Box
sel.type("id=textinput","Selenium");
//Handling Checkbox
sel.check("id=checkboxinput");
sel.click("//input[@type='radio' and value='b']");
}
public static void main(String args[])
{
Controls a = new Controls();
a.test();
}
}

Selenium Tutorials Assertions in Selenium


For verifying in selenium we have two verification points ,those are
  • Assert
  • Verify
  • WaitFor
  • Assert:If the test case pass it will go to the next test case and if the test case is fail then it will stop execution.
  • Verify:If the test cases pass or fail it will execute all the test cases at end of execution it eill display result.
  • WaitFor:WaitFor command is used to wait upto some extend to enable some condition to become enable.
Asserts
  • Assert Text Present:Verify the text on where ever in web page
  • Assert text:Verify the location of text
  • Assert Title:Verify the page title
  • Assert Element Present:Verify the element is present in web page
Assertions/Verify commands in Selenium IDE While Recording
  • Open Selenium IDE
  • Enter URL in Base URL of IDE
  • Enter same url in Firefox browser
  • Click on Enter
  • Right click on any where on page
  • You will see available commands according to below screen.

How to download and install the Selenium IDE


Follow below steps to download Selenium IDE firefox add on


  • Open Selenium.hq.org web site
  • Click on Downloads
  • Download latest version of Selenium IDE
  • Allow in window
  • Click on Install Now
  • Restart the firefox browser
  • Open firefox menu Tool-->Selenium IDE

How to Create new Project in HP QC Admin

In this post we are going to learn how HP QC administrator is creating projects,domains in HP QC Administrator ,HP QC is a Test Management Tool where Software Testers will raise the defects once found in Functional testing,Integration Testing and Regression Testing.

HP QC/ALM not only using for Raise the defects and also use for project maintenance ,Tracking of the application status.


Below are the Steps to create project in HP QC admin

  1. Login to site admin
  2. If domain does not exists, click on create domain
  3. Enter domain name and click on Ok
  4. Click on create project
  5. Select the option “Create an empty project” and click on next
  6. Enter project name and select the domain under which project is to be created. Click on next
  7. Select db as MS-SQL and enter db details (it will be auto-populated, leave it as is). Click on next
  8. Select project administrator from right grid and move it to left grid. Click on next
  9. Check the checkbox activate project and enable versioning. Create of create
  10. Click on send email automatically checkbox

Powerful Automation Testing process in HP QTP


Automation testing process steps
  1. Tools Evaluation
  2. Analyzing Test Cases
  3. Preparing Modules sheet
  4. Effort Estimation
  5. Preparing summary report using POC
  6. Automation folder structure
  7. Preparing Object Repository
  8. Creating Library functions
  9. Creating scripts
  10. Dry run
  11. All script Execution
  12. Preparing Results
  13. Delivery of scripts-Framework

Successful versions of QTP tool


QTP is known as Quick Test Professional (QTP),QTP is used to test Functional as well as Regression testing purpose.


Below are the QTP versions till now.

QTP VERSIONS
Name
Version
Released
Astra Quicktest First version May 1998
Astra Quicktest version 3.0 Feb 2000
Astra Quicktest version 5.0 Feb 2001
Quick Test Professional version 6.5 Sep 2003
Quick Test Professional version 8.0 2004
Quick Test Professional version 8.2 2005
Quick Test Professional version 9.0 April 2006
Quick Test Professional version 9.1/9.2 Feb 2007
Quick Test Professional version 9.5 Jan 2008
Quick Test Professional version 10.0 Jan 2009
Quick Test Professional version 11.0 Sep 2010
Unified Functional Testing version 11.5 Dec 2012

It supports popular environments including
  • Windows
  • Web
  • Dot Net
  • Java
  • SAP
  • Active x
  • Siebel
  • Oracle.... etc

How to Configure Selenium WebDriver in Eclipse

How to Configure Selenium WebDriver in Eclipse,it is very easy to configure Selenium WebDriver in Eclipse to prepare Selenium WebDriver Test scripts in Eclipse development tool.Selenium WebDriver jars can be downloaded from HERE.Please read Selenium Tutorials.

How to Configure Selenium WebDriver in Eclipse:

You can configure Selenium Jar files in Eclipse tool with the help of Configure Build Path option in Java Project,Please follow below step by step Tutorials to Configure Selenium WebDriver in Eclipse.

Steps:


1.Download "selenium-java-2.41.0" from selenium web site as mention above paragraph.
2.Download Eclipse for code writing from Here 
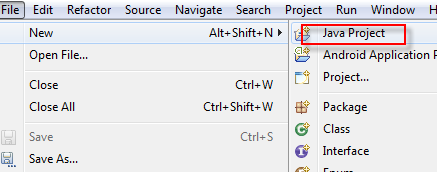
3.Now open Eclipse.
4.Right click on "Project Explorer" to create New project please follow below screen shots for mo re details.
How to Configure Selenium WebDriver in Eclipse

5.Enter Project name for Example Selenium WebDriver as below screenshot.
How to Configure Selenium WebDriver in Eclipse


6.Click on Finish.
7.Now project will create like below.
How to Configure Selenium WebDriver in Eclipse


8.Now right click on Project folder-->Build Path-->Configure Build Path.
How to Configure Selenium WebDriver in Eclipse

9.Select Library->Add External Library->Select all downloaded selenium-java-2.41.0 jar files from these folder.
How to Configure Selenium WebDriver in Eclipse

10.Click on OK button it will create Referenced Libraries in project folder as below screenshot.


How to Configure Selenium WebDriver in Eclipse


Thank you for reading Please read More Selenium Concepts.Please provide your valuable comments on this post.

Selenium XPATH Tutorials

Selenium Verification Points.

Read data from Excel using Selenium

Selenium DataDriven Framework

Handle Confirmation Box using Selenium